There are so many posts about deploying KeyCloak on Azure App Service, inside a docker container. But recently I wanted to install it on Azure App Service “bare metal”, (as bare as it gets on an Azure App Service!) i.e. without using docker. Here is what I discovered and did to get it up and running.
First some useful links about KeyCloak and Wildfly:
- KeyCloak: Overview, Getting started, Server Admin
- Wildfly Admin guide
Here is a summary of what I have done:
- Azure: Get an App Service and SQL Database
- KeyCloak: Download and Configure
- Deploy using VS Code
- Deploy using Azure DevOps
- Create the Admin User
Azure: Get an App Service and SQL Database
This is the most straightforward part to perform. Just go to the Azure Portal and get a Web App with runtime stack “Java” (I chose version 11) and Java web server stack “Java SE Embedded Web Server”. I feel more comfortable using Java on Linux, so I chose Linux as the OS.
For the Database, I bought the cheapest variant of Azure SQL Database. In the Firewall configurations, I made it accessible for Azure components.
KeyCloak: Download and Configure
I then downloaded the standalone server distribution version of KeyCloak and unpacked the content in my computer. As I wanted to be able to track my configuration changes in a git repository and, furthermore, create Azure DevOps pipelines for installing KeyCloak later, I created a git repository and pushed the contents of the KeyCloak Server to it.
I used Visual Studio Code (VS Code) with git and Azure Extensions.
Enable Remote Access
The first configuration change I performed was to enable remote access to Wildfly. To achieve that, I opened the stanalone.xml file (under the standalone/configuration) and changed the interface section as follows:
<interfaces>
        <interface name="management">
            <any-address/>
        </interface>
        <interface name="public">
            <any-address/>
        </interface>
</interfaces>
I committed the change and moved on to the next step: It is necessary to enable the “proxy-address-forwarding”. So I added proxy-address-forwarding=”true” to the default http-listener, and committed this too:
<subsystem xmlns="urn:jboss:domain:undertow:10.0" default-server="default-server" default-virtual-host="default-host" default-servlet-container="default" default-security-domain="other" statistics-enabled="${wildfly.undertow.statistics-enabled:${wildfly.statistics-enabled:false}}">
            <buffer-cache name="default"/>
            <server name="default-server">
                <http-listener name="default" socket-binding="http" redirect-socket="https" enable-http2="true" read-timeout="30000" proxy-address-forwarding="true"/>
            ...
Taking Care of the MSSQL Database JDBC Driver
Next step was the JDBC driver for MSSQL. I navigated to the modules/system/layers/keycloak/com and created three new nested folders microsoft/sqlserver/main. I then downloaded the Microsoft JDBC Driver for SQL Server inside the main folder above. Having the driver rest in place, I created an XML file inside the main folder and named it “module.xml”. The content of this XML file should be like this:
<?xml version="1.0" ?>
<module xmlns="urn:jboss:module:1.5" name="com.microsoft.sqlserver">
    <resources>
        <resource-root path="mssql-jdbc-8.4.1.jre11.jar"/>
    </resources>

    <dependencies>
        <module name="javax.api"/>
        <module name="javax.transaction.api"/>
    </dependencies>
</module>
(Change the “path” attribute of the resource-root according to the version you have downloaded.)
I needed to register that driver in the standalone.xml file, under the drivers section as follows:
<driver name="sqlserver" module="com.microsoft.sqlserver">
                        <driver-class>com.microsoft.sqlserver.jdbc.SQLServerDriver</driver-class>
                        <xa-datasource-class>com.microsoft.sqlserver.jdbc.SQLServerXADataSource</xa-datasource-class>
                    </driver>
Finally, I added a <datasource> that uses my brand new “sqlserver” driver under the datasources section of the standalone.xml file. There is one with jndi-name=”java:jboss/datasources/KeycloakDS” which is for the default “h2” driver. I just replaced it with a new one:
                <datasource jndi-name="java:jboss/datasources/KeycloakDS" pool-name="KeycloakDS" enabled="true" use-java-context="true">                    <connection-url>jdbc:sqlserver://[YOUR DB SERVER].database.windows.net:1433;DatabaseName=[YOUR DB NAME];</connection-url>
                    <driver>sqlserver</driver>
                    <security>
                        <user-name>[USER NAME]</user-name>
                        <password>[PASSWORD]</password>
                    </security>
                    <validation>
                        <background-validation>true</background-validation>
                        <background-validation-millis>30000</background-validation-millis>
                    </validation>
                </datasource>
Once again, I committed my changes.
Deploy using VS Code
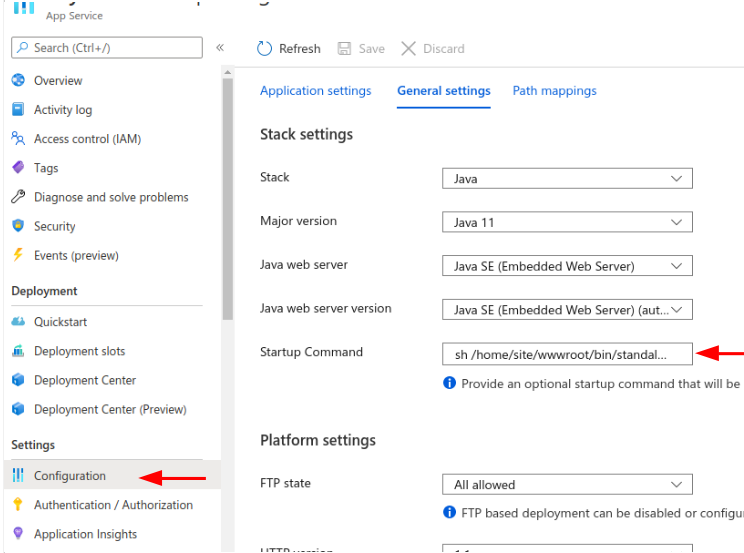
As mentioned above, I used Visual Studio Code (VS Code) with git and Azure App Service Extension. The deployment using the Azure App Service extension was straightforward: First of all, I set the startup command:
sh /home/site/wwwroot/bin/standalone.sh
I did it in Azure Portal, in the configuration section of the App Service:
Then, in VSCode, I logged in to my Azure account (using the command pallet issuing “azure: sign in”). Then, again using the command pallet I issued “azure: app service deploy to web app”. VS Code asked me to choose the directory I want to deploy, the Azure subscription, and the Web App I wanted to deploy KeyCloak to it. It took some minutes until all contents uploaded to Azure App Service (under /home/site/wwwroot/), and it took several minutes until the startup command finished the initialising of the database and started KeyCloak. I could follow the steps using Log stream, which is accessible through the Azure Portal or by using the Azure CLI command “az webapp log tail“.
Deploy using Azure DevOps
To deploy uisng build/release pipelines of azure DevOps, I first created a build pipeline, based on my git repository and branch, containing four tasks:
Copy files to staging folder: The goal is to copy just what is needed for the application to run, nevertheless keep the rest in the repository for future testing and references. For example, the folder “docs” contains some examples you may want to keep in the repository, but they are not needed for the deployment. I wanted to copy the necessary contents in a folder, let us call it “target”. It is then easy to clean and avoid publishing unnecessary files, as we shall see later. Here is the yaml representation of my copy task:
steps:
 task: CopyFiles@2
 displayName: 'Copy files to staging folder'
 inputs:
 SourceFolder: '$(system.defaultworkingdirectory)'
 Contents: |
  *.jar
  *.txt
  *.xml
  bin/**
  modules/**
  standalone/**
  themes/**
  welcome-content/**
 TargetFolder: '$(build.artifactstagingdirectory)/target/'
 CleanTargetFolder: true
 condition: succeededOrFailed()
Next is archive: The goal is to create a zip file, to be used for deployment later, based on the contents of the folder “terget”, but outside of it:
steps:
 task: ArchiveFiles@2
 displayName: 'Archive $(build.artifactstagingdirectory)/target/'
 inputs:
 rootFolderOrFile: '$(build.artifactstagingdirectory)/target/'
 includeRootFolder: false
Notice that the “includeRootFolder” is set to false. Otherwise a folder called “target” will be created under the “home/site/wwwroot/” on the Azure App Service and the Keycloak contents will be extracted under that “target” folder after deployment.
Then Delete: Now I could easily remove the whole “target” folder, as its content are already archived in my zip file in the previous task:
steps:
 task: DeleteFiles@1
 displayName: 'Delete files from $(build.artifactstagingdirectory)/target/'
 inputs:
 SourceFolder: '$(build.artifactstagingdirectory)/target/'
 Contents: '*'
 RemoveSourceFolder: true
Finally publish:
steps:
 task: PublishBuildArtifacts@1
 displayName: 'Publish Artifact: drop'
 inputs:
 PathtoPublish: '$(build.artifactstagingdirectory)'
 condition: succeededOrFailed()
Now that I have published a clean, deploy ready zip file, I can create a release pipeline, containing an “Azure App Service Deploy” task to deploy it:
steps:
 task: AzureRmWebAppDeployment@4
 displayName: 'Azure App Service Deploy: <appname>'
 inputs:
 azureSubscription: <myazuresubscrp>
 appType: webAppLinux
 WebAppName: <appname>
 RuntimeStack: 'JAVA|11-java11'
 StartupCommand: 'sh /home/site/wwwroot/bin/standalone.sh'
Create the Admin User
Finally, I needed to create an initial administrator user, see this. I decided to ssh to the App Service and run the bin/add-user-keycloak.sh command. To do that, I installed the Azure CLI and then issued the command:
az webapp ssh --name <appname> --resource-group <azurerg>
to open an ssh connection to the App Service. Then:
sh /home/site/wwwroot/bin/add-user-keycloak.sh -r master -u <admin user name> -p <password>
That was it. I hope it is useful to someone else too.

Could you please help me with the process involved if i am doing a zip push deploy to azure app service which is windows based
LikeLike
For windows app services, it is better to use the WebDeploy. But basically, the zip must be copied/unzipped under the physical path, i.e. \home\site\wwwroot\
LikeLike
@szarghani Thanks for your response. I did a zip push deploy to \home\site\wwwroot\. The folder was successfully copied. What should i do next? How to start the .bat file? Could you please help me on that?
LikeLike
@szarghani One more query? Could you please tell me the endpoint to access keycloak after setting it up in app service. /auth is what i tried andit gave me the message The requested resource [/auth] is not available.
eg : https://domain.net/auth
LikeLike
Sorry for late reply. The /auth/ redirects to the admin console. The /auth/admin/master/console/ is what use normally to login and use keycloak
LikeLike
@szarghani great article. I have a problem though. When the container starts up i get the following
2021-03-17T12:57:27.970258466Z Running STARTUP_COMMAND: sh /home/site/wwwroot/bin/standalone.sh
2021-03-17T12:57:27.982586050Z /home/site/wwwroot/bin/standalone.sh: line 2:
: not found
2021-03-17T12:57:27.983795458Z /home/site/wwwroot/bin/standalone.sh: line 6:
: not found
2021-03-17T12:57:27.983821958Z /home/site/wwwroot/bin/standalone.sh: line 14: syntax error: unexpected word (expecting “in”)
2021-03-17T12:57:27.984921366Z Finished running startup command ‘sh /home/site/wwwroot/bin/standalone.sh’. Exiting with exit code 2.
any thoughts?
LikeLike
Run the script either as:
bash script.sh
or just:
./script.sh
and see if it helps.
If not: Check the file. See if it has the #!/bin/bash at the beginning. Actually I have the feeling that you get the not found error on empty lines…see if this:
https://stackoverflow.com/questions/7362504/bash-script-prints-command-not-found-on-empty-lines
helps.
LikeLike
Thanks for the reply. It seems like the main .sh .conf files needed to be dos2unix’d and that has allowed the app to appear to run. however the app just spins and eventually errors.log shows things started and on https:127.0.0.1:9990 but i cannt get to the site. Did you have to register any additional ports or web config. We have the site running over 8080 which i think is normal but that just times out.
LikeLike
No, as far as I can remember, i did nothing for the ports…but i do not access it through port 999x or 8080, I just use the http(s) link of the Azure App service…
I just checked the Azure App Service, and there was no web.config or any thing besides the KeyCloak’s own files…
I also checked the standalone.sh, and found no changes related to the ports, besides the proxyforwarding, of course.
Maybe relevant: In my case, I had to create a firewall rule to make the database accessible:
New-AzSqlServerFirewallRule -ResourceGroupName “…” -ServerName “…” -AllowAllAzureIPs
I also checked the configuration of the App Service:
az webapp config show –name … –resource-group …
but could not found anything of interest.
LikeLike
Hello is there any change on getting this as Deploy To Azure script? So far I have to many issues and this one the easiest way I found to deploy keycloak with SSL
LikeLike
@szarghani Great article, saved my day. Thank you very very much.
But there is a point. I changed the port numbers at standalone.xml.
<socket-binding-group name=”standard-sockets” default-interface=”public” port-offset=”${jboss.socket.binding.port-offset:0}”>
…
<socket-binding name=”http” port=”${jboss.http.port:80}”/>
<socket-binding name=”https” port=”${jboss.https.port:443}”/>
…
</socket-binding-group>
I can run the keycloak app with this configuration change. Maybe it could be useful for someone else.
Thanks again.
LikeLike
If someone experienced an app that is still not accessible after changing the port. Try adding “WEBSITES_PORT” with a value of 80 or whatever port you have from “standalone.xml” in your App Service – Settings -> Configuration then restart your app.
LikeLike
Just in case someone has a problem building their app specifically with “Copy Files” & “Archive Files” that says “[error]Error: ENOENT: no such file or directory, stat ‘D:\a\1\s\target\'”. Just change it from “$(Build.ArtifactStagingDirectory”” into “$(Build.BinariesDirectory)/target/”.
LikeLike
@szarghani Hello, what’s are the best practices to deploy Keycloak on azure cloud using either docker or k8s?
LikeLike